Today I shared a card on my Instagram feed for the Crafty Collaborations Monochromatic Insta Hop. We are featuring one of our long-standing neutral colours – Early Espresso. When I saw this week’s colour I immediately knew I was going to share a card using the Sepia technique.
WHAT IS SEPIA TONE?
Sepia is a term generally used in photography where photos are edited/printed in brown, tan and reddish tones. It’s a black and white photo with some warmth added to it. There is a lot more of a technical aspect with the photography side (I’m not a photographer) but this is the basic colour explanation to an amateur such as myself.
I remember my parents’ wedding photo from 62 years ago had a sepia tone. It was not black and white but brown and white. With my card today, I wanted to create the Sepia look using Early Espresso ink. I’ve used the Magnolia Mood bundle from our Online Exclusives range and right now it’s on sale until 30th June for $85.50 (regular price $96.25).
HOW TO CREATE THE FOCAL IMAGE
Spritz a sheet of Fluid 100 Cardstock with water
Using a Water Painter, paint Early Espresso over the entire piece using the ink refill and lots of water. You want to create a wash over the Cardstock.
Leave to dry or use a Heat Tool to dry it well.
Stamp the magnolia image with Jet Black Stazon ink
Using Early Espresso ink refill and a Water Painter, watercolour the image with a fairly dry brush. This will give you more control over the application of the colour, allowing you to apply dark and light shading.
Add a small amount of Pecan Pie in sections to highlight. I did this where I thought the sunlight would hit the image.
Allow image to dry completely
Add shading with Early Espresso and Basic Black Watercolor Pencils, creating some shadow on the petals and leaves.
Once dry, I added some veins on the leaves with a White gel pen.
Die cut some additional leaves from Fluid 100 Cardstock (to add behind the main image)
Roughly apply Pecan Pie ink refill with a Water Painter. This will give some white space which adds to the texture.
The Embossing Folder I’ve used on the background is called Birch Wood and will be available in our September – December Mini Catalogue. As a demonstrator, I’ve had the opportunity to purchase this and some other products early as part of an Online Event we have coming up. I just had to use it on this card as it looked so pretty with it.
I hope you give this technique a try. It’s a lot of fun and really gives great results. If you have any questions please don’t hesitate to get in touch with me. Want to purchase any of these products? Just click on any of the images below and you will be taken to my Online Store where you can make your purchase or alternately contact me to place your order.
STAMP & DIE BUNDLE SALE UNTIL 30TH JUNE
GET MORE VALUE
Purchase a Starter Kit for $169 and choose $235 of product shipped free to you.
Today for the Crafty Collaborations Monochromatic Insta Hop we are featuring one of the least used colours in my collection. Poor old Mossy Meadow doesn’t get much of a look in generally but today, it’s front and centre on my card.
When I work with a rather strong colour, I like to tone it down with a softer neutral. In this case – Gray Granite. I really like how these 2 colours blended.
I stamped the leaves onto a label die cut using the Countryside Corners dies. On the base of this I added a piece of Take to the Sky Designer Series Paper and a strip of Basic White Cardstock coloured with Soft Pastels.
How to create the white panel
Use the Mossy Meadow Soft Pastel on the length to drag across the strip of Cardstock, filling it in with the colour. Then turn the Pastel vertical so the small square end is against the Cardstock. Draw lines at varied heights to create an interesting panel.
I created a Faux Suede panel for the background. This is done by scrunching up Cardstock and breaking down the fibres with a bone folder. In time, the Cardstock will peel apart, giving you 2 halves. I’ve used one half on this card and have one left for another project.
A few silver pearls strewn around work in with the Gray Granite and the check DSP.
I hope this project inspires you to perhaps try out a technique you haven’t tried before. Thank you for stopping by and I hope you have a lovely Saturday.
GET MORE VALUE
Purchase a Starter Kit for $169 and choose $235 of product shipped free to you.
Last weekend we had our Crafty Collaborations Monochromatic Insta Hop. The featured colour was Berry Burst.
I created a card using the Spotlight on Nature stamp set for my focal image which was coloured with Stampin’ Blends and fussy cut.
The background Berry Burst Cardstock panel was stamped with the butterfly from the Labeled with Love stamp set in Versamark Ink. This was heat embossed in Clear Embossing Powder. On the top right of this panel, I blended Berry Burst ink for some darker shading.
Using the Perennial Postage dies I die cut a frame from the Berry Burst Designer Series Paper and on the square frame stamped the sentiment in Tuxedo Black. For some added interest and layering I fussy cut some stamped hexagons from the Bee my Valentine stamp set. I felt this worked really well with the elements on the card and added some nice contrast.
A detailed strip of Glimmer die cut using the Irresistible Blooms dies was added at the back. Silver trim and some pearls finish this card off ‘berry’ nicely.
You can purchase the products used in this card in my Online Store or by getting in touch with me. The best value is to purchase a Starter Kit. Right now until 31st May you can take advantage of our extra value Starter Kit.
For $169 you will get your pick of $235 of product + $144 of In-Color products as pictured below. This is a whopping $379 value for just $169. Plus it’s shipped free to you. Purchase a Starter Kit HERE.
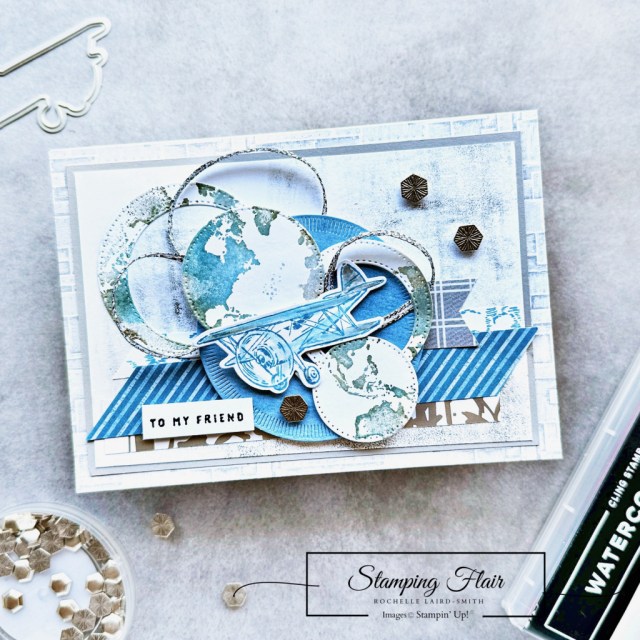
Happy Saturday! Welcome to another monochromatic Insta Hop with the Crafty Collaborations team. Today our feature colour is Azure Afternoon. I’ve taken to the skies with my card, inking up my new Watercolor World stamp set for a fun product combination.
I started off by inking the Watercolor World stamp with Smoky Slate and Azure Afternoon, using Sponge Daubers. Then I spritzed the stamped with water to create a more watercoloured effect, before stamping the image.
I die cut the circles and it so happened that I had cut my circles a little bit off centre. This became a design element on my card. I laid out all the circles for a fun pattern, mixing it with some Designer Series Paper strips. A small strip of White Cardstock was stamped with the clouds in Azure Afternoon to bring in another textured look.
The background was brayered with Smoky Slate by rolling the brayer in both directions to create a criss-cross pattern. To ‘tie’ it all in, I wove Silver ribbon under and through the circles which gave more detail and interest while bringing together all the patterns and textures.
I felt that it needed a focal image to draw the eye in, so I added the plane which was coloured in with a Blender Pen. Some Industrial Trinkets put a nice finishing touch to this card.
Any of these products are available in my Online Store or by getting in touch with me.
Welcome to this week’s monochromatic Insta Hop with the Crafty Collaborations team. We are featuring a beautiful, subtle yellow – Lemon Lolly.
The Round We Go bundle caught my eye immediately when I looked through the new catalogue. I loved the different pinwheels that could be created by comining different images and die cuts. Not only for cards, these would be great for tags, gift packaging and home decor pieces.
The largest pinwheel is assembled by die cutting 2 stripes of the longer die and then folding each concertina style. Glue them together to form the pinwheel. In the centre, I die cut a circle and stamped it with the Leaf Collection background stamp.
Using different dies, patterned paper and textures, I was able to create an interesting layout. I splattered some dots with a Misty Moonlight Stampin’ Blend and stamped the sentiment in Misty Moonlight. Initially I thought I would us Black but I felt this was too harsh against the softness of the yellow and opted for the Misty Moonlight which is from our Neutrals range.
This piece would make a great home decor piece or addd a nice accent to a nursery, just by adding a frame to it.
Do you love what you can do with this bundle? I hope you consider adding it to your next order which can be placed in my Online Store below. Alternately, get in touch with me to place the order for you. When you order through me, you not only get quality Stampin’ Up! products, I am also there to help you use those products and get the best out of your purchase.
Look forward to hearing from you and helping you in your creative journey.
The content in this blog is the sole responsibility of Rochelle Laird-Smith as an Independent Stampin’ Up! Demonstrator. The use of and content of classes, services or products offered is not endorsed by Stampin’ Up!


")
")

 Designer Series Paper")


 Polka Dot Trim")


")
 Designer Series Paper")


 Diagonal Trim Combo Pack")


")
")
 Glimmer Specialty Paper")
 Designer Series Paper")


 Trim Combo Pack")


")
 Specialty Designer Series Paper")
 Designer Series Paper")
 Designer Series Paper")


")

 Designer Series Paper")


